Giving depth to your mixes is an essential element for a quality music mix. That’s why it’s important to know how to push something further back in your mix. But how do you do this simply and without damaging the signal? I explain it all in detail in this article.

Here are 3 ways to push something further back in your mixes:
- Turn down the volume
- Cut the mid frequencies
- Add reverb (early reflections)

Before Starting…
In this article, the audio example we will work on will be vocals, and more specifically ad libs. But it is important to keep in mind that these techniques apply to any type of source.
There will obviously always be some fine tuning to be done depending on the source being processed, but the principle will always remain the same overall.
I also recommend that you follow these tips in order for best results!
Here’s the audio clip we are going to work on in this article:
Space is different from depth
Too many people are convinced that adding a reverb with a super long decay will automatically put a source in the background. Don’t fall into this trap, it’s not true.
In fact, this can be true, but only if one of the reverb parameters is properly adjusted AND the song’s universe lends itself to it. There will have to be a lot of space for that reverb to fit.
This leads us to something essential in music mixing: space is different from depth. If we take the example of the long decay reverb, this would describe this situation perfectly.
Using a reverb as a hall u a long flat instantly adds space for the source to live in, but not necessarily depth. By confusing the two, you risk creating an unfocused and very blurry background. This is to be avoided to get pro results!
Keep this in mind as you read on… and throughout your learning process!
We’re good to go now!
1. Turn down the volume

Many mix amateurs feel a kind of “shame” about using the volume fader to push certain elements into the background of the mix. Many feel that doing so is not “professional”.
However, it is the easiest way to give distance to an element in a mix. Always keep in mind that a good balance between all sound sources is the basis of a good mix. And for that, no need for EQ, compressors or reverb, just a volume fader!
In fact, it’s a totally natural phenomenon. If you hear something quieter relative to the overall volume of the mix, you will always perceive it as further away from you.
In our ad lib example, I simply turned the track level down by 4dB. Part of the job is already done! It does not conflict with the lead voice and automatically distances itself from the listener:
2. Cut the mid frequencies

In the frequency spectrum of a human voice, each frequency band will be responsible for an emotion, a sensation and a feeling.
But the one we are interested in here is the mid frequencies, because it is this band that is responsible for the sensation of presence and proximity.
Indeed, around 2 kHz, you can either boost this frequency zone to make your vocals more “present” in the mix, or cut it to give it some distance. It is this second technique that we need.
To do this, I advise you to use a full-parametric EQ in which you can modify the frequency, the gain of the band and its width (Q).
The first thing to do is to identify the frequency zone responsible for the sensation of proximity of vocals. I mentioned 2 kHz, but it could be 1 kHz for some voices and 3 kHz for others.
As a general rule, the zone of presence of male vocals is a little lower than 2 kHz and that of female vocals a little higher than this frequency.
When the frequency zone has been identified, it will then be necessary to turn down, with a wide enough band, all this frequency band of a few dB to create this sensation of distance.
But when I speak of a few dB, how much exactly are we talking about? It depends a lot on the type of voice, the microphone used and the song itself. I would say that the ideal reduction is generally between 5dB and 10dB.
It’s up to you to listen to the result in context and make the best decisions according to your feeling!
By adding this filter in the mid frequencies, here is the result we get:
And… What about the high frequencies?
You will often hear that in order to push sound elements further in the mix, you should simply cut the high frequencies.
Yes, that works too, because it follows a principle of acoustics that says that the further away a source is, the more the high frequency energy will weaken. This is even something that I sometimes do myself in vocal mixing, in addition to the filter on the mid frequencies.
But there is only one problem with this type of filtering: you lose the essence of the source. As a reminder, the purpose of this article is to list the techniques that allow you to push audio sources further into the mix without degrading the signal.
If necessary, you can also proceed to a high frequency filtering and/or a light de-essing, but keep in mind that this will slightly degrade the neergy and the essence of this element


3. Add reverb (early reflections)

At the beginning of this article, I told you that a long decay reverb is very rarely the solution to give distance to an element of a mix. But “early reflections” reverbs often work very well. What is it exactly?
An “early reflections” reverb is a reverb that simulates only the first reflections of a room or hall. They are therefore very short but allow, in the mix, to give distance to a source.
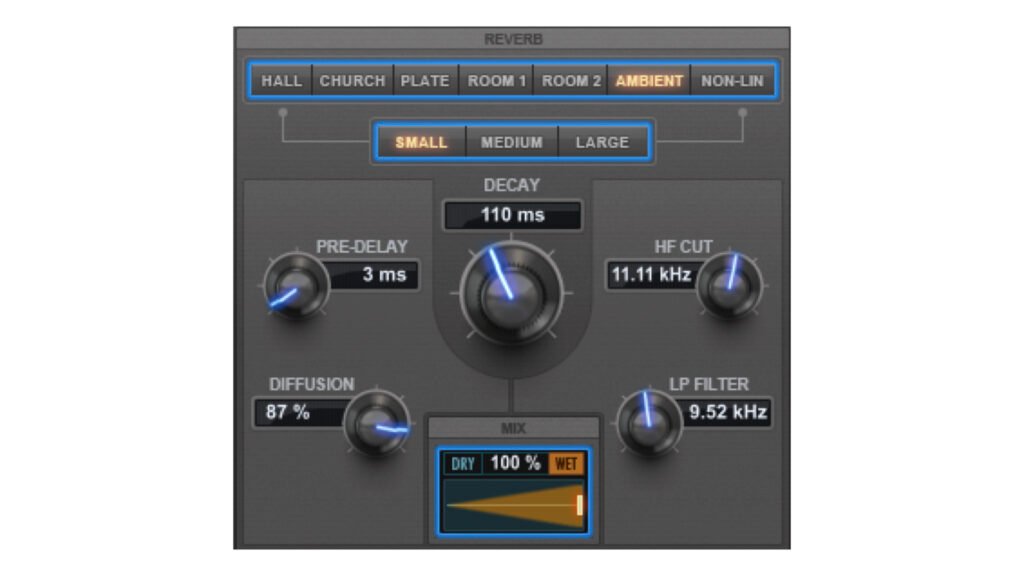
It could be, if you don’t have many plugins in your library, that you don’t have early reflections presets in your reverb(s). If this is the case, here are the parameters to use:
- Decay time between 80ms and 150ms: The decay time must be very short, no need to have a very long tail. The closer you get to 80ms, the more likely you are to get a powerful and “obvious” result. Anything closer to 150ms will be softer and more subtle (depending of course on the balance between direct signal and reverb).
- Pre-delay between 1 and 5ms: A pre-delay that is too long will risk re-cluttering the source at the front of the mix, because the longer the pre-delay, the more a sense of proximity is emphasized. Choosing 5ms would be more natural. Whereas 1ms would support the distance effect created by the reverb.
You can either decide to use it as an insert for more speed in the workflow but with a risk of losing yourself a bit in the balance. Or by using the early reverb reflections in parallel with an auxiliary.
Volume – EQ – Reverb. Here’s the result:
ℹ️ You don’t really know how to use the auxiliary principle in your DAW ? Then I advise you to read this article: How To Use Reverb On Vocals – The Pro Guide
Is that it?
For some of your projects, following this approach can be more than enough to push something further into the mix. But for others, it may be necessary to do more.
In music mixing, you should never stop at the theory, at the risk of creating boring mixes with no energy. You always have to go further to get the best ideas out of your mind.
For our example, I only added an extra AutoPan (PanMan), and…
From there…
We get here
It might also be appropriate to add a delay to put these ad libs in the same universe as the rest. But, actually, this is largely sufficient as it is!
Don’t forget that a good mix is also a creative mix!
Need a professional sound engineer specializing in pop and hip-hop mixing ? Great! Take a look at our services and let’s blow up your career together!
Let’s start now!
Conclusion
Decrease the volume, cut the mid-range frequencies and add early reverb reflections. That’s all that’s needed to push something further into a mix.
Don’t bother with complex frequency changes, or reverbs armed with 38 knobs… you don’t need all that! Keep it simple!
Make sure to contact me if you have any questions about this topic or about anything in the music mixing field, I’m always very happy to help!
Related Articles:
How To Use Reverb On Vocals – The Pro Guide
How To Blend Reverb And Delay With Rap Vocals
My favorite tools for mixing pop and hip-hop music:
Plugins
In the field of auto-tune, I’m convinced that nothing’s better and more efficient than Antares Auto-Tune Pro. As for the EQ’s, FabFilter Pro-Q3 and Slate Digital Infinity EQ are, in my opinion, the best tools. For compression, I have 2 favorites plugins: Waves RComp and UAD EL8 Distressor.
As for reverb, I’m a big fan of the Soundtoys Little Plate, but generally, I go for the Valhalla VintageVerb for its versatility. I also love the Arturia Rev PLATE-140 and the UAD Pure Plate for its organic side.
Headphones
The closed headphones I love and will always love using for mixing pop and hip-hop music are the Beyerdynamic DT-770. As for the best open-back headphones, I use the Sennheiser HD600 headphones, and I’m really happy of them!
Monitors
Having a pair of Yamaha HS7 in its studio or home studio is always cool for more excitement while listening to your mixes. The Adam Audio T7V monitors are also super accurate. In my studio, I also have a pair of Genelec 8030 for their reliability.
Hardware gear
For anyone who wants to start using hardware in their mixes, I always recommend these 2 units from Klark Teknik: the EQP-KT and the 76-KT. Don’t forget to use good converters, such as the Apollo interfaces. This is essential for a good rendering.


