How to use Waves Tune Real-Time on rap vocals? What are the best parameters to use? Are some more essential than others? If you’ve recently purchased the Waves auto-tune plugin, having all these questions answered will boost your efficiency in using this plugin!
Overview
Waves Tune Real-Time is an auto-tune plugin released by Waves in 2016. Waves’ bet is big, to compete with the legendary Antares brand and its auto-tune plugins always at the cutting edge of technology.
According to the big plugins manufacturer, Waves Tune Real-Time is a plugin that allows vocalists to stay in tune while singing, feel comfortable and confident and focus on the emotion of their singing.
While many auto-tune plugins are designed only for the studio, Waves Tune Real-Time will work just as well live as in the studio.
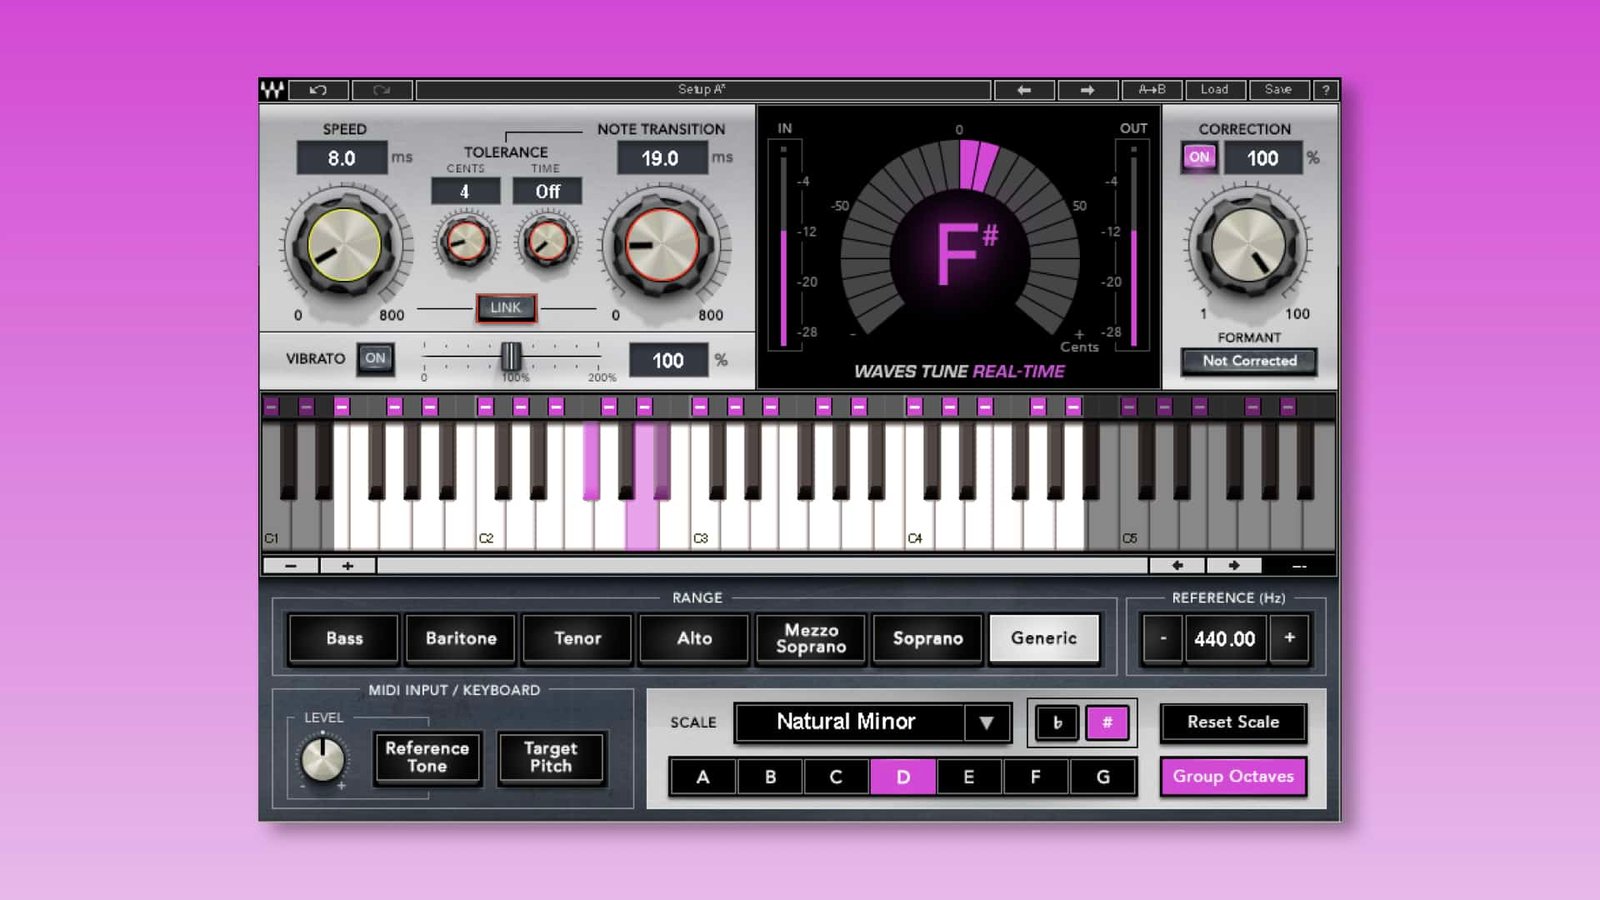
The first thing that stands out in the interface of the Waves plugin are the two knobs located relatively on the left. As you can see, these are the two most important knobs for the automatic pitch correction.
On the right, there is a knob of « quantity » of correction. We will see that this very instinctive parameter will allow you to reach the optimal result very quickly.
You can also see a piano roll in the center of the plugin to help the user find his way around the pitch of the source. It is always very useful to have it in front of you.
Then, in the lower part of the plugin, we find everything about the correction area and the scale that will be used by the auto-tune. In the interface, everything is indicated in a very clear way and allows the user to work in a structured way.
Need a professional sound engineer specializing in pop and hip-hop mixing ? Great! Take a look at our services and let’s blow up your career together!
Let’s start now!
1. Choose the right key

Before diving into the details of the type of correction needed, it is essential to first choose the key in which the piece is located. By not determining this parameter, it is completely useless to use an auto-tune.
But… If my knowledge of music theory is not good enough to find the key by ear (which is totally legitimate), how can I choose the right one?
There are actually some tools or techniques that can help you depending on your level of music theory.
A. Use a Key Detection Plugin
This technique is to be favored by people who have no (or very little) knowledge of music theory. But in fact, what is this kind of plugin?
A key detection plugin is a plugin that, placed in the insert of an audio track, allows to detect the key or the scale of a source, whether it is monophonic or polyphonic.
Most of these plugins are very accurate and the error rate is usually very low. Without any knowledge of music theory, you can either copy or export the result provided by the detection tool in Waves Tune Real-Time.
There are a lot of those plugins on the market. I advise you to read this article written by Integraudio to choose the key detector that will fit your needs.
B. Find the first chord
This technique requires a little more knowledge of music theory than the first one. But simple basics will be sufficient.
Generally, in music, with the exception of very rare cases, the first chord is the one that determines the key or scale of a song.
So if you are a guitarist, keyboardist, pianist or player of any polyphonic instrument, all you have to do is find the first chord and set it as the key of the piece you are working on.
This technique has one big advantage: it’s free!
2. correction area

Waves Tune Real-Time will always work best when the correction area (called range in the plugin) is well determined. Indeed, anything outside this area will simply not be processed by the plugin.
To find the best match, the simplest and most effective technique is to play the vocals and choose the zone that best « surrounds » the range of this voice.
If you don’t want to take any risks, you can leave this parameter on « Generic », but this is risky especially with low male voices with a wide range.
It already happened to me several times, when I first used Waves Tune, to leave the setting « Generic » and to hear horrible false notes in the low frequencies. I quickly realized that I had to be more precise.
Don’t make the same mistake I did, make decisions!
3. speed

When it comes to auto-tuning vocals, there are generally two paths open to the user:
- Either the use of auto-tune aims to give a robotic aspect to the vocals.
- Or the tool will be used to correct a more or less natural pitch.
The most important parameter in view of this choice is this: Retune speed. In Waves Tune Real-Time, the speed will control how quickly the plugin will start to adjust the pitch.
Of course, it should be kept in mind that the choice will sometimes, even often, lie between these two paths. Here are some value ranges that can help you make decisions faster:
A. From 0.1 to 10 ms (Robotic)
Anything in this speed range will give the vocals an unnatural, robotic feel. These kinds of settings will clearly distort the tone of the voice and will be noticeable even to the general public.
If this is the color you are looking for for artistic purposes, I advise you to go for these values! Be careful not to adjust the retune speed too much when the notes of the singer/rapper are too far from the key. This can create unpleasant artifacts.
B. From 15 to 25 ms (Natural)
In this range, Waves Tune Real-Time will sound much more natural. It will distort the timbre and color of the voice very slightly and will sometimes be noticeable, but it will remain very natural.
I would use these settings in the case of a rapper/singer who can sing well but still let some slight falseness come out.
C. From 30 to 60 ms (Transparent)
In this range, the influence of Waves Tune on the color of the vocals will be almost imperceptible.
In a rap music mix, you will probably only rarely use this kind of values. But if the rapper is a good and experienced singer and some importance is given to the precision of the notes, then you can clearly start with these values.
D. Above 60 ms (Very Subtle)
It’s extremely rare to use this kind of value with vocals, even more so when mixing rap vocals.
With these kinds of values, it’s going to be very transparent and not very noticeable at first, but it’s going to be super slight. The difference between the original vocals and the vocals processed with Waves Tune Real-Time will so slight that even by comparing the two audios in live, you probably won’t be able to differentiate them.
4. Note Transition

The speed and note transition might seem almost similar at first glance, but this second parameter is only important when a note change occurs.
Indeed, in Waves Tune Real-Time, the note transition determines the speed at which the plugin will start working on a note change.
In short, speed will influence the speed of correction within a note. What the transition note parameter does not have.
Some people often use the « LINK » button located between the two knobs to bring out some consistency in the pitch correction.
Why not! But personally, I have always found that, in Waves Tune Real-Time, a note transition below 5-10 ms produces a lot of unnecessary artifacts.
Even if the goal is to get a robotic result, values between 10ms and 25ms are ideal. But this is my humble opinion, it’s up to you to try to listen to the result you like the most.
Trust your ears!
Need a professional sound engineer specializing in pop and hip-hop mixing ? Great! Take a look at our services and let’s blow up your career together!
Let’s start now!
5. Listen to the result
Now that we have set the most important parameters, it’s time to listen to the result created by Waves Tune Real-Time.
Take a minute to listen to the vocals with the instrumental, solo, with or without backings vocals, varying the balance,… in short, the goal is to alternate a very close and then a very wide listening of the lead vocal.
This step is primordial to be able to make the right decisions in the rest of the process. During your listening, you will have to focus your attention on:
- Accuracy of notes: Is the melody of the vocals accurate? Or, on the contrary, do the notes sometimes deviate from the chosen key or scale?
- Note transitions: Are the transitions between each note change smooth or, on the contrary, rather hard?
- Color and tone: Is the tone of the vocals denatured/robotized or is the original color intact?
You will see that taking these 3 elements into account will be decisive for the end of the auto-tune process. We’re getting there!
6. Tolerance

The tolerance parameter, divided into two sub-parameters, allows slight flaws to escape in a more or less obvious way depending on the adjustments chosen.
But why would we do that? Let’s take a closer look…
A. Cents
The « cents » parameter determines how far each note can deviate from the exact target note.
As a reminder, in music, the cent is a measure that divides the semitone into 100. It does not correspond to absolute scale values but should be used for fine tuning purposes.
Let’s take an example. I decide to leave a tolerance of 10 cents in Waves Tune Real-Time. Each note emitted by the singer/rapper, being more or less close to the target note, will be maximum 10 cents above or below this exact note.
Why use this parameter? In fact, it allows for slight melody flaws that will be perceived by the listener as natural and aesthetic flaws.
Keep in mind that even the best singers in the world never sing to the exact cent, there is always a slight margin of error which, when it is very small, is often appreciated for the naturalness it brings out.
B. Time
The « Time » parameter follows the same principle as the « Cents » parameter, except that instead of focusing on the accuracy of the note, it will focus on the accuracy of the note transition.
This can be very interesting when the range of the singer/rapper is large and he often switches from low to high notes (and vice versa).
Let’s take the following situation. In one of the parts of the songs you are working on, there comes a moment when the singer/rapper gives a very low note and then, suddenly, a very high note. If the note transition is relatively short, the note change may sound unnatural or even unpleasant.
This is where our « Time » parameter can come into play to soften the « slope » and make it more natural.
7. Vibrato ?

Just below the two « main » knobs, you can see a Vibrato parameter that goes from 0% to 200%. It will, as its name suggests, create a vibrato around the target note to simulate the vibrato of the human voice.
In my opinion, for mixing rap vocals, this parameter is quite useless. It is only useful when very long notes are emitted by the singer/rapper, which is, let’s be honest, quite rare in rap and hip-hop music.
But if you feel that this vibrato can be ideal in certain parts of the song you are working on, then automate it and activate it only on the most suitable notes.
Don’t forget that automations are often forgotten by music mixing amateurs, but it is often the element that makes the difference between pro and amateur mixing.
8. Correction Knob: The Master

If we had to compare Waves Tune Real-Time to a mix session, the « Correction » knob would be like the master fader. The one that takes all the audio information and processes it as a whole. Here, it’s more or less the same principle.
The « Correction » knob allows you to adjust the mix between natural voice (not processed by Waves Tune Real-Time) and voice processed by the plugin and therefore auto-tuned.
At 0%, it is as if Waves Tune did not exist. At 100%, all the parameters you have chosen will be applied in an exact and precise way.
Adjusting this parameter will usually add some naturalness to an overly processed and robotic signal.
It’s up to you to see if you need it or not!
Formant
Did you see this little hidden parameter? Just below the « Correction » parameter, a grey button called « Formant » will allow to switch from « Corrected » to « Not Corrected », what does it mean?
Without going into too much detail, the formant affects the timbre of the voice without changing its frequency. If you want to have a very robotic voice, you can choose « Not Corrected ». But if you want a more natural voice, then you are clearly better off choosing « Corrected ».
And… Can I Modify the scale manually?
In some cases, you may want to create your own scale or slightly modify the original scale or key. But can we do that with Waves Tune Real-Time?
Yes, you can!
When you have chosen the key or scale to which the auto-tune should refer, you will have noticed that small purple squares will be drawn above the keyboard. These are the so-called « illegal » notes. In fact, in Waves Tune Real-Time, you will find several types of notes.
A. The Legal Note
In the Waves plugin, a legal note is a note that can be issued AND corrected by the plugin. In Waves Tune, these notes are overlaid with empty grey squares.
B. The Illegal Note

An illegal note is a note that cannot be output from the plugin and will be corrected to the nearest legal note. In Waves Tune Real-Time, there are several types of illegal notes:
- Minus: This is the basic illegal note of Waves Tune. If this note is reached as input, the plugin will move it to the nearest legal note, whether it is higher or lower.
- Right Arrow: This type of illegal note will automatically send the note to the legal note located higher in the pitch range.
- Left Arrow: In this case, a note that would reach this note in input would be automatically sent to the legal note located lower in the pitch range (that’s a lot of « notes », I know!).
C. The Bypass Note

If you click once more on the square, you will see a gray « X ». This means that if this note is reached, it will simply not be processed by Waves Tune Real-Time. In short, when this note is reached, everything that is in the input will be in the output of the plugin.
Need a professional sound engineer specializing in pop and hip-hop mixing ? Great! Take a look at our services and let’s blow up your career together!
Let’s start now!
Conclusion
Here we go! You now have all the tools you need to use Waves Tune Real-Time in the best way on your rap vocals. You can see how easy and intuitive this plugin is to use, and the audio quality is worth it!
Behind all these technical tips is one important thing that I repeat in almost all my articles: Trust your ears! Nowadays, we are often trapped by what we see, and this should be avoided at all costs. So listen and analyze, but don’t rely on what you see on the screen.
Make sure to contact me if you have any questions about this topic or about anything in field of music mixing, I’m always very happy to help!
My favorite tools for mixing pop and hip-hop music:
Plugins
In the field of auto-tune, I’m convinced that nothing’s better and more efficient than Antares Auto-Tune Pro. As for the EQ’s, FabFilter Pro-Q3 and Slate Digital Infinity EQ are, in my opinion, the best tools. For compression, I have 2 favorites plugins: Waves RComp and UAD EL8 Distressor.
As for reverb, I’m a big fan of the Soundtoys Little Plate, but generally, I go for the Valhalla VintageVerb for its versatility. I also love the Arturia Rev PLATE-140 and the UAD Pure Plate for its organic side.
Headphones
The closed headphones I love and will always love using for mixing pop and hip-hop music are the Beyerdynamic DT-770. As for the best open-back headphones, I use the Sennheiser HD600 headphones, and I’m really happy of them!
Monitors
Having a pair of Yamaha HS7 in its studio or home studio is always cool for more excitement while listening to your mixes. The Adam Audio T7V monitors are also super accurate. In my studio, I also have a pair of Genelec 8030 for their reliability.
Hardware gear
For anyone who wants to start using hardware in their mixes, I always recommend these 2 units from Klark Teknik: the EQP-KT and the 76-KT. Don’t forget to use good converters, such as the Apollo interfaces. This is essential for a good rendering.


