If you’ve recently gotten into vocal recording and would like to start mixing those vocals, you’ve probably already heard of a tool called a compressor. But what exactly is an audio compressor? And how do you use it with vocals? Answer here!

An audio compressor is a tool for reducing the dynamic range of an audio signal, which means reducing the level differences between the highest and lowest levels. It can be in hardware form or as a plugin.
In addition to its purpose of reducing dynamics, it can also, depending on the type of compressor: give more punch, more snap or character, add color or warmth or even « glue » a mix.
Parameters of a compressor
We will see later in this article that different types of compressors exist for different purposes. But first, if you don’t know much about compressors. I advise you to start simple, for example with the stock compressor of your DAW.
In these compressors, which we will call « classic », there are parameters that come up every time. Let’s have a look at them.
A. Threshold
The threshold defines the level at which the compressor acts on the source. This means that, as soon as the level of the audio source rises above this threshold, the level will be decreased more or less according to a certain ratio. It is generally between – 1 and -40 dB.
B. Ratio
The ratio defines the ratio between the incoming and outgoing level above the threshold. In other words, it defines how much the levels above the threshold will be reduced. The higher the ratio, the stronger the decrease. To explain this in a more concrete way, let’s take an example based on the picture below.

- Let’s first focus on the purple/pink line. You can see that the ratio is 1 : 1. This means that x dB input equals x dB in output. There’s no compression.
- Now let’s look at the green one. The ratio is now 2 : 1, This means that an incoming signal with a level of 6 dB at the input would only be 3 dB at the output.
- The blue line, which has a ratio of ∞ : 1 is very interesting. It means that whatever the incoming signal level is, it will never go above the output threshold level. This is the principle of the limiter.
This shows us that anything below the threshold level will not be affected by the compressor. Only the loudest levels will be reduced.
C. Attack and Release Time
When the signal level goes above the threshold, it will, as we said, be reduced by a certain ratio. But does this happen instantaneously ? No! The compressor will need some time to kick in and to release.
The attack time is the time it takes for the compressor to switch on after the incoming signal rises above the threshold level. It is usually between 5 microseconds and 500 milliseconds.
The release time is the time it takes for the compressor to release after the signal has fallen below the threshold level. In other words, it is the time it takes to return to a ratio of 1 : 1 (no compression).

This kind of process happens many times every second. Every syllable is subject to compression. So choosing the right attack and release times is essential for good results. We will see this later.
D. Makeup Gain
If you reduce the loudest levels, the general level will inevitably be reduced as well, which is logical. This is why it will be necessary to compensate for this loss of level at the output. To obtain the same level at the input as at the output, you must use the makeup gain knob.
By doing this, the highest levels will be brought closer to the initial level, and the lowest levels will be boosted in relation to the input level. The dynamic range between the highest and lowest levels is smaller. Our signal is now compressed.
In the example below (vocals):
- The green track represents the initial audio.
- In yellow the compressed signal without makeup gain.
- And in red the compressed signal with makeup gain.

Need a professional sound engineer specializing in pop and hip-hop mixing ? Great! Take a look at our services and let’s blow up your career together!
Let’s start now!
How to use Compressors with vocals
It is important to remember that a compressor is not always necessary. It’s very rare not to add one to vocal tracks, especially in hip-hop and pop, but if you feel that all of the following points are met, don’t draw a compressor.
All too often, amateur sound engineers think they’re doing the right thing by following codes to the letter, forgetting that every music mixing situation is different.
In vocal mixing, there are actually several situations in which a compressor may be necessary. In each situation, its use will be different. Before even adding a compressor, it is important to know why. Knowing the « why« , you can then think about the « how« .
Very often, there are several « whys ». This is why a professional sound engineer often uses several compressors on the same vocal track.
Let’s take a closer look!
A. Level Control
The main reason to use a compressor on a vocal track would be to keep more control.
Indeed, when recording, it often happens that some syllables or words are either too loud or too quiet, which can be unpleasant to listen to.
Using a compressor will therefore allow you to keep control over these variations in levels and thus reduce the dynamics and keep the level constant throughout the song. For control purposes, using a « classic » compressor will be more than sufficient.

Classic parameters :
- Threshold : Between -15 dB and -25 dB if the vocals were recorded correctly. Make sure to catch all the loudest levels and leave the quietest ones below the threshold level.
- Ratio : From 2.5 : 1 to 4 : 1 for recordings with large dynamic range.
- Attack : Between 2 ms and 10 ms. You can go higher for softer vocals.
- Release : Between 80 ms and 200 ms. The longer the release time, the more crushed and less « open » the vocals will sound
But how can I make sure that the values I chose are the right ones ? The best way to find the right parameter values is to push the knobs extremely hard on either side, listen to the result, and then adjust the values according to what you hear.
B. coloration and character
Compressing vocals is not just about reducing the dynamic range. One of the biggest motivations of sound engineers is also to give character, power, and a more interesting color to the vocals in the mix.
In this respect, a simple compressor will no longer be sufficient. You have to use something that adds color to the voice, real character. The best way to achieve this is to use a FET compressor
This type of compressor is often appreciated for the warmth it adds and for the slight distortion it produces when pushed to its limits. The best known hardware FET compressor is undoubtedly the 1176 from Universal Audio.
The CLA-76 from Waves, the FG-116 from Slate Digital, the Black 76 from IK Multimedia or the 1176 emulation from Universal Audio themselves. Some are more expensive, others very close to the analog sound result, some are easier to use than others,… You are spoilt for choice!

These compressors do not work like conventional compressors. Indeed, as you can see on the picture above, there is no threshold level, just an input and output level.
Despite the appearance, this compressor is very instinctive and easy to use.
Classic parameters :
- Attack : Between 4 and 7. Note that these are not milliseconds, and that the higher the value, the shorter the attack time. The shortest value is 1 microsecond, which is very very short.
- Release : Between 5 and 7. The shortest value is 50 milliseconds and the longest is 1,1 s.
- Ratio : 4 or 8. Higher if you want to add a sort of crush to the vocals.
- The best results happen when the VU is around -3 to -5 dB. You will have to adjust the input level to get this target.
Be careful though, because all the emulations of the 1176 are different. The gain staging as well. So if you want to compare several emulations, make sure to read the manual to know the exact value of each parameter.
If you use it in the right way, the vocals should be richer, warmer and more colorful.
C. Peak limiting
All microphones do not react in the same way to transients. Some mics sometimes make these sounds very short and disturbing. It is therefore ideal to get rid of them.
As a reminder, a limiter is in fact a compressor with a ratio of ∞ : 1. As most limiters have an ultra-short attack time, no signal will go above the threshold level
More and more sound engineers working in pop music use limiters to prevent aggressive transients from disturbing the overall signal.
They should therefore be used with a relatively high threshold to capture only very loud and very short levels.
Using a limiter also gives the vocals more robustness and power. If you wonder how the voices of the biggest pop hits are so robust, it’s probably thanks to this tool.

D. Parallel Compression
Parallel compression is an advanced mixing technique that blends an uncompressed signal with a highly compressed signal.
It is the ideal technique to give more robustness to the voice while boosting it and pushing it to the forefront of the mix.
To use this principle, you can either duplicate your vocal track, or use the auxiliary principle to send the dry signal to a separate track. In this case you will need to use a pre-fader bus. I personally find the second way easier to handle in a mix situation.
Want to learn more about parallel compression ? Follow this full guide to improve your skills now!

But you’re probably asking yourself the question « What parameters will I use in the parallel track? ». Answer now!
Classic parameters :
- Very low threshold level : You have to capture the entire signal to compress it hard. Even the quietest levels.
- Very fast attack : A few microseconds if possible
- Medium release time : Between 200 ms and 600 ms
- Relatively high ratio : Between 6 : 1 and 10 : 1
The main purpose of that principle is not to make a nice compression on the parallel track. It has to be compressed in an extreme way. The ultimate purpose is to have a robust sound result with the combination of the uncompressed and compressed signal.
VCA compressors usually work really well.
Best compressors for vocals
The choice of compressor is very subjective. It depends on your taste and experience. Moreover, in 2022, the quality of the plugins and emulations available on the audio market is constantly increasing. But in the context of this article, I think it’s important to give you some ideas to explore.
A. Your stock compressor

Yes, you read well! Your stock compressor. Keep in mind that stock plugins, no matter which DAW you use, are created to help you get started with your software. They are not meant to get in your way.
Of course, this kind of plugin will not give any color or character to your vocal tracks, but they are usually very effective for doing simple things. Because yes, compressing vocals doesn’t always mean an ultra complex process.
I personally use the Pro Tools compressor very often as the first compressor in my vocal chain. Not to give the vocals a certain power or robustness, but simply to have something constant and straight to work with in the rest of my chain.
Using stock or free plugins is not a shame. Far from it. If you are able to make good mixes with this kind of plugin, you are already very good.
B. RComp (Waves)

RComp is probably one of the best plugins in Waves. It is used daily in the biggest studios in the world. And this for 2 reasons :
1. Its versatility
The versatility of RComp is impressive. You can literally do anything with this plugin. It will work great with a bunch of different sources. But why?
Simply because of the buttons at the bottom of the plugin, which allow you to change the type of compressor emulated by the plugin. As we have seen above, the compression applied can have a very different result depending on the type of compressor used.
In this plugin, the differences are slight but still sufficient to train your ears to the different types of compression that exist.
2. Its ease of use
RComp is super instinctive and easy to use and the interface makes it very quick to get the hang of the plugin.
This kind of feature is often overlooked, but mixing is also about efficiency. And using this plugin from Waves will make you more efficient than ever!
C. CLA-76 (Waves)
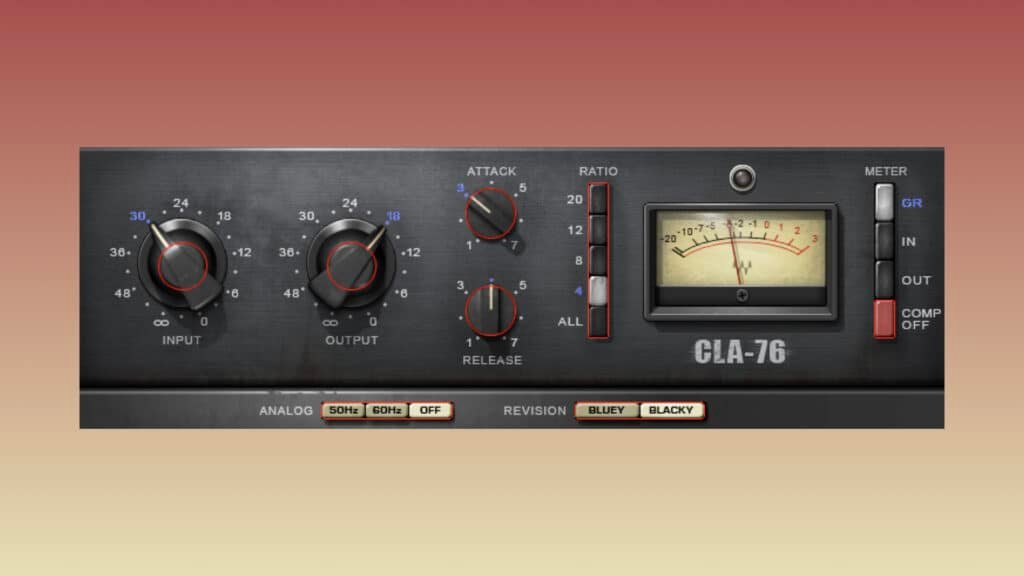
We saw earlier in this article that FET compressors were ideal for giving color, character and robustness to voices, especially the very famous 1176 from Universal Audio. But which emulation to choose among the dozens that exist today?
If I had to make a choice based on the primary purpose of a FET compressor, I would choose the CLA-76 from Waves. It’s not the most faithful to the original (UAD’s is unsurprisingly so), but it’s the one that adds the most color to the sources compressed by this plugin.
A must-have plugin in vocal mixing!
D. LA-2A (UAD)
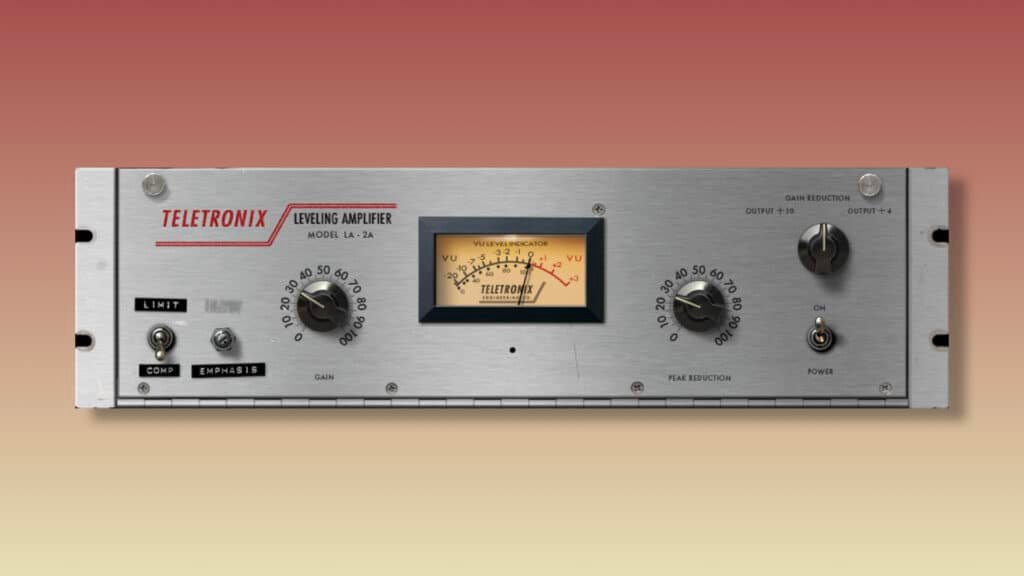
We have not talked much about optical compressors in this article, simply because the goal is to explain in a clear and precise way the methods to compress voices, without putting the tools in priority.
But in vocal mixing, optical compressors are very popular. Especially the LA-2A from Teletronix.
Without going into too much detail, this type of compressor uses a light trigger combined with a photocell to compress the incoming signal. These compressors are very sensitive and are not built to withstand big transients.
That’s why this LA-2A emulation is an ideal tool to put the vocals at the front of the mix at the end of the vocal mixing chain. By acting on the whole signal (and not only on the loudest levels), the vocals will be instantly warmer and more powerful.
Your future compressor choices will obviously not be limited to these 4 plugins! They are simply tools that will allow you to quickly and efficiently apply what has been explained in this article.
Of course, you are free to use others. The audio plugin market is more than ever flourishing and the quality only increases over the years.
Get informed, choose what suits you best, and… have fun!
Conclusion
Through this article you can see that behind the relatively simple definition of a compressor there are countless tools that sculpt the audio in completely different ways. Some of them in a quite complex way with a lot of parameters, and others in a very simplistic way with just two knobs.
In vocal mixing, keep in mind that when a compressor is used, you need to be able to answer the question « why? Depending on the answer, you will be able to determine which parameters to prefer and which type of compressor to use.
The best way to learn how to best use vocal compressors is to push the knobs to the extremes and then listen to the sound and adjust the values accordingly. By doing this, you’ll get a feel for how each tool works, and your ear will grow even faster!
If you have any question about compressors or about vocal mixing in general, contact me, I’m always very happy to help!
My favorite tools for mixing pop and hip-hop music:
Plugins
In the field of auto-tune, I’m convinced that nothing’s better and more efficient than Antares Auto-Tune Pro. As for the EQ’s, FabFilter Pro-Q3 and Slate Digital Infinity EQ are, in my opinion, the best tools. For compression, I have 2 favorites plugins: Waves RComp and UAD EL8 Distressor.
As for reverb, I’m a big fan of the Soundtoys Little Plate, but generally, I go for the Valhalla VintageVerb for its versatility. I also love the Arturia Rev PLATE-140 and the UAD Pure Plate for its organic side.
Headphones
The closed headphones I love and will always love using for mixing pop and hip-hop music are the Beyerdynamic DT-770. As for the best open-back headphones, I use the Sennheiser HD600 headphones, and I’m really happy of them!
Monitors
Having a pair of Yamaha HS7 in its studio or home studio is always cool for more excitement while listening to your mixes. The Adam Audio T7V monitors are also super accurate. In my studio, I also have a pair of Genelec 8030 for their reliability.
Hardware gear
For anyone who wants to start using hardware in their mixes, I always recommend these 2 units from Klark Teknik: the EQP-KT and the 76-KT. Don’t forget to use good converters, such as the Apollo interfaces. This is essential for a good rendering.


