Nowadays, mix bus processing has become almost essential for a quality result. But what are the plugins to add on your mix bus to achieve a pro result ? And how to use them ? Full answer in the following article!

The top 10 plugins for mix bus processing are:
- Waves L2
- Slate Digital FG-X Virtual Mastering Console
- Waves SSL G-Master Buss Compressor
- Black Box Analog Design HG-2
- Sonnox Oxford Inflator
- Slate Digital Virtual Mix Rack
- brainworx bx_digital V3
- Waves Vitamin
- UAD Pultec EQP-1A
- FabFilter Pro-Q3
This top 10 is actually a mix between my own preferences as a mixing engineer and the most used plugins among producers and other professional hip-hop sound engineers.
So this is the best source you can find to give your mixes more power, clarity, punch and robustness, without spending hours finding the right plugins.
Keep in mind of course that everyone’s taste in plugins is different. So it’s very unlikely that you’ll use all of these plugins for all your future mixes, but you’ll certainly be able to use a good half of them!
Feel free to learn more about each plugin by clicking on the blue button below each picture.
MixBus Processing: is this mastering?
There is often confusion, even in the pro world, between mix bus processing and mastering. Is it the same thing? And above all, will I prefer certain plugins in one or the other situation?
Actually, when we talk about mix bus processing, we are referring to a frequency and dynamics processing that aims to make a song more attractive, more energetic, more powerful or simply more comfortable to listen to. It always depends on the musical genre and the song in question.
Mastering is based on exactly the same principle but does not have exactly the same purpose. The purpose of this production step is to work on the dynamics and the frequency spectrum of a song to make it available in the best conditions on a listening support (streaming platforms, CD, vinyl, etc…)
As a general rule, except in exceptional cases, the mastering process takes into account a certain amount of mix bus processing carried out beforehand, although mix bus processing does not always mean mastering.
In the professional world of mixing and mastering, the mix bus processing is often operated by the mixing engineer, whose goal is to create the best mix rendering to let the mastering engineer work in the best conditions.
BUT
This does not mean that these plugins can only be used for mix bus processing. These plugins are also used by professional mastering engineers. Depending on the situation you are in and your level of mixing or mastering, your choices might differ.
Most Popular Choice ⤵️
1. L2 (Waves)
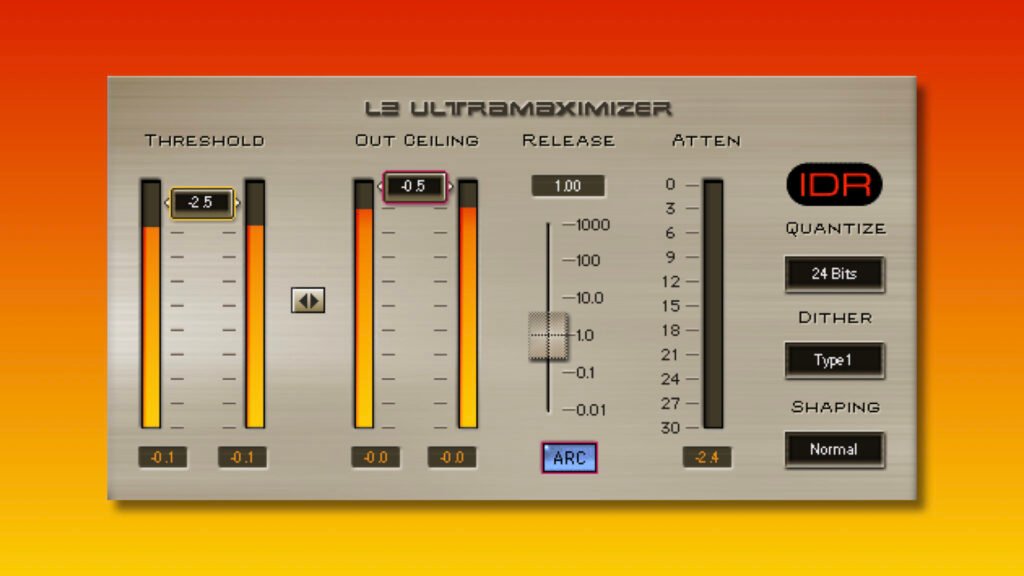
L2 is a peak limiter and level maximizer plugin from Waves that can be used for both mixing and mastering. Its particularity: it is literally in every studio in the world.
Mixing engineers often use it to give a slight boost to their mix. Either for listening comfort, or so that the artist has an idea of the mix when it will be mastered, or simply to take advantage of the extra energy that L2 offers to its users.
For mastering engineers, it is often one of their key links in the mastering chain. It allows them to limit levels without artifacts and to enjoy a boost that keeps all the clarity of the incoming signal.
I personally use it on almost all my mixes (before mastering then) with a threshold of -2.5 dB and an out ceiling set at -0.5 dB to avoid any kind of clipping. I also like to take advantage of the ARC (Automatic Release Control) feature which allows to adjust the release according to the dynamics of the incoming signal. I have never been disappointed!
Regarding the other 3 parameters (quantize, dither and shaping), they will generally be adjusted as follows:
- Quantize: 24 bits
- Dither: None
- Shaping: Normal
I choose these values because I always work in 24 bits in my Pro Tools mixing sessions, I don’t need dithering at this stage of the process and I like to take advantage of the slight shaping that L2 offers.
But if you use this tool in mastering, these values could be totally different, remember that it’s only mix bus processing.
Uses:
➡️ Level boost
➡️ Peak Limiting
IDeez Studio’s Choice ⤵️
2. FG-X Virtual Mastering Console (Slate)
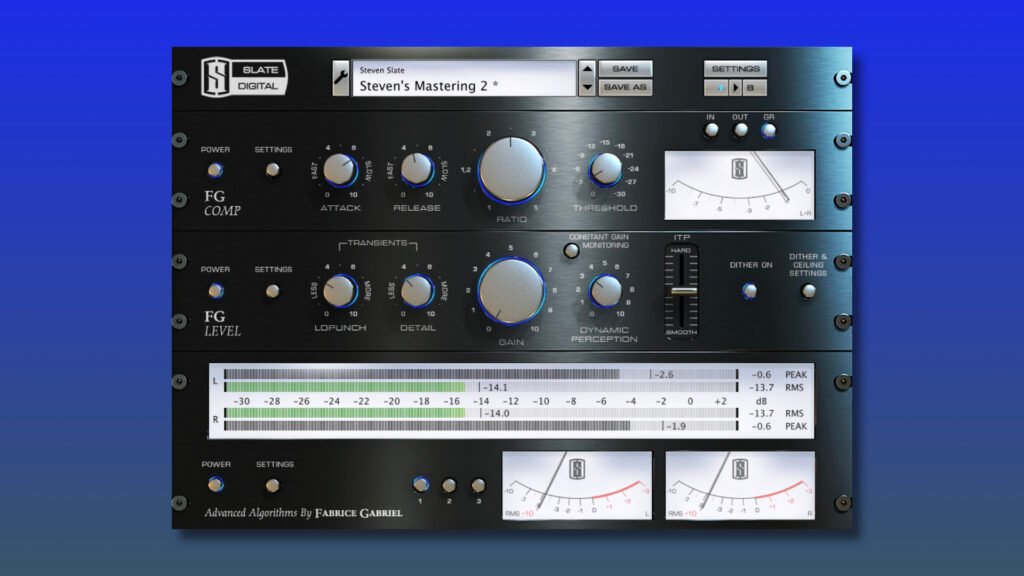
To be honest with you, I only discovered this plugin a few months ago. I wanted to try something new in my mix bus processing chain. So I came across this plugin from Slate Digital, and I fell in love with it in 2 minutes. Since then, I use it on all my bus mixes, literally.
This plugin is separated in two modules, the FG-Comp and the FG-Level. You will have understood it, the first module will be used for compression, and the second one for boosting your mix. But let’s take a closer look.
FG-Comp
The FG-Comp is a mastering compressor that allows you to tighten and glue your mix in a super transparent way. It has an attack, release, ratio and threshold knob, everything we need to compress a mix in the right way.
FG-Level
The FG-Level is a transient and loundness enhancer that allows you boost the entire incoming signal without killing the dynamics of the song. It is mainly equipped with a lopunch and a detail knob that allow to control the treble and bass transients in a totally independent way, a gain knob and, finally, a knob called dynamic perception.
The most interesting use of this plugin is obviously to combine the two modules. This is where you will get the best results.
When I use FG-X, I always start with the preset called « Mastering 2 » which is a very transparent preset that only aims to give a small energy and power boost to the source.
From there, even if this preset is a very good base, I will first adapt the attack and release by always favoring a longer attack and a shorter release time. I will then adjust the ratio (I usually don’t go higher than 2.5:1), then the theshold to have a gain reduction around 1 to 1.5 dB.
On the next module, it’s up to you to see what your mix needs. It always depends on the mix that goes in. If you use this plugin as a mix bus processing (and therefore not in mastering), I advise you not to touch the gain knob, it could degrade all your adjustments.
Uses :
➡️ Transient enhancement
➡️ Level enhancement
➡️ Analog touch

Value For Money Choice ⤵️
3. SSL G-Master Buss Compressor (Waves)
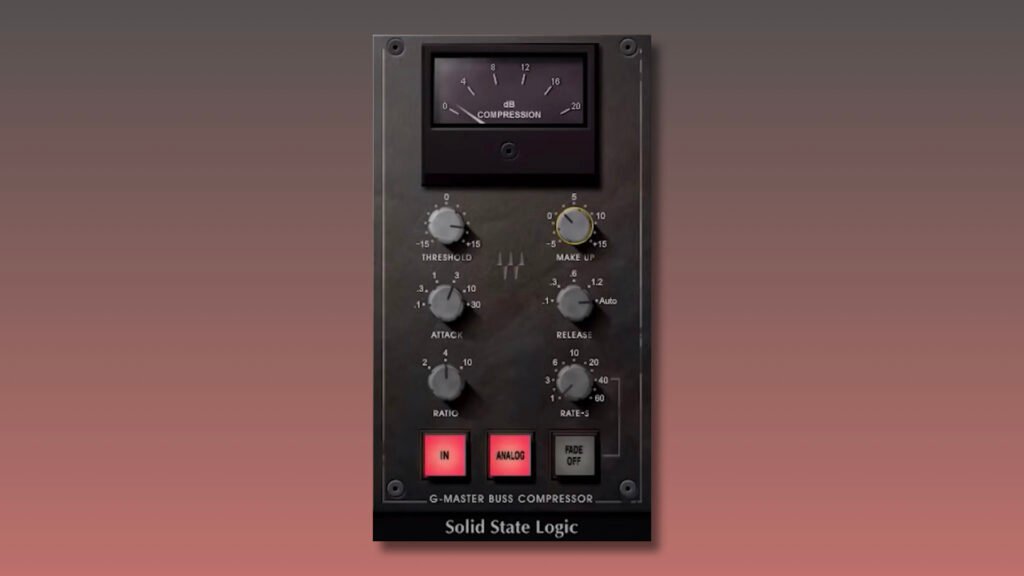
The SSL G-Master Buss Compressor is an emulation of one of the most legendary VCA compressors in the history of music: the SSL 500-Series Bus Compressor. When it comes to glue compression, it is clearly one of the best if not the best in its field. It also has the advantage of being extremely easy to use and quick to pick up.
But is its digital emulation created by Waves worth all the praise of the hardware version? Actually, there are many different opinions about the quality of this plugin. Some love it and others find that it doesn’t provide the slight analog color that many are looking for.
From my side, my opinion about this plugin is pretty clear: this plugin works incredibly well for its selling price. As a reminder, the original hardware piece sells for over $2000. On the Waves store, you can get the plugin for… 29$ only!
For the quality it delivers, and taking into account the price range of Waves’ competitors, it’s definitely worth 10 times more, without hesitation. But how to use this plugin to enhance the punch of your mixes?
ℹ️ Compressors are complex but very easy to use when you understand how they work. If you want to learn how to use them with vocals, click here: What Is An Audio Compressor ? How To Use It With Vocals ?
Setup and Presets
With this plugin placed on your mix bus, I advise you to use it as follows:
- Threshold: Adjust it so that the gain reduction does not exceed 2 or 3 dB maximum.
- Attack: Whatever the musical genre, relatively slow attacks are often preferred (like any good VCA compressor). I often tend towards 1 for songs with aggressive transients and rather 10 for « softer » songs.
- Release: The adjustment of this parameter will always depend quite strongly on the song itself, aggressive transients or not. If you can’t make up your mind, I advise you to choose the « Auto » mode which works perfectly.
- Make-Up: After compressing the incoming signal, even subtly, it will be important to properly stage your mix and add a slight boost with the make-up gain. The goal is to have the same level (when listening) between the incoming and the outgoing level.
- The last parameter at the bottom right of the plugin is purely optional, I advise you not to pay attention to it.
Note: In the latest update of Waves (V14), some plugins now have a mix knob. It’s convenient, but in my opinion completely useless for this kind of plugin, I advise you to leave it at 100%.
Uses :
➡️ Glue Compression
➡️ Analog Color (warmth & presence)
4. Black Box Analog Design HG-2 (Brainworx)
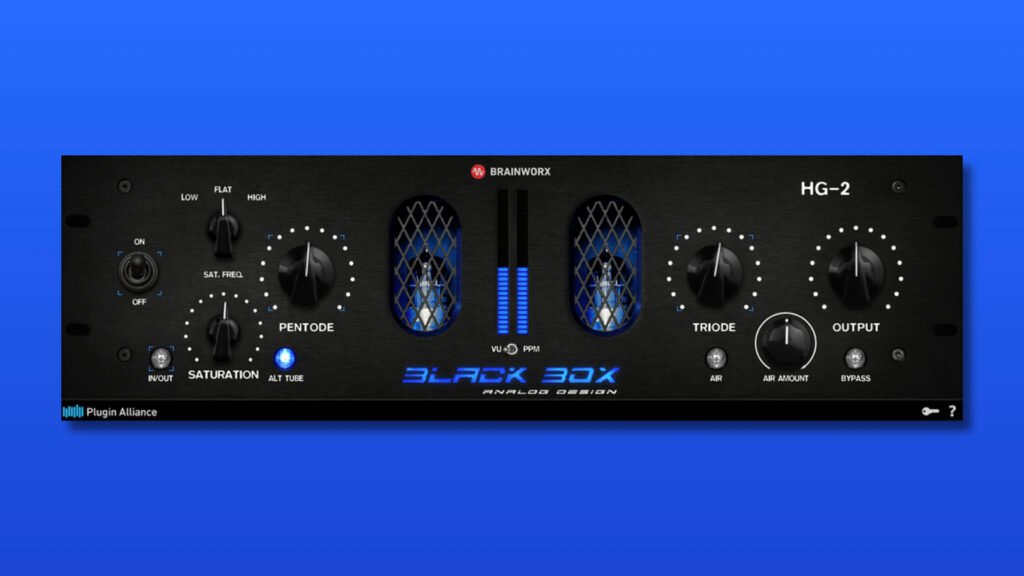
If I had to make this ranking according to my own preferences only, I would have put this plugin at #1 without hesitation. I discovered this plugin about a year ago, when I was watching a video of the Mix With The Masters channel with Greg Wells working on the soundtrack of The Greatest Showman. When he activated this Black Box Analog Design HG-2 on his mix bus, I was just… blown away!
Black Box Analog Design HG-2 is a saturation unit dedicated mainly to uses as mix bus processing. It is mainly equipped with a pentode emulating saturation knob and a triode.
It also has a « general » saturation knob and an « Air amount » knob which, as its name suggests, allows you to adjust the amount of air added by the plugin.
Used in the right way, this tool is simply magic. It will boost the power of the low end while giving more character to the high end of the spectrum, and this without excess (if the dosage is right).
Setup and Presets
Here is the ideal way to use it (in my opinion) as a mix bus processing:
- Sat. Freq.: You can leave it on « flat », this will be the best way to let the saturation tool process the audio signal.
- Saturation: As a mix bus processing, 50% should be okay, but push it further if you feel like you need more character.
- Alt Tube: This parameter will enhance the saturation especially in the high-end range, switch it from in to off and judge for yourself if it helps the song!
- Pentode / Triode: Start at exactly 52% and let the plugin impresses you…
- Air: Do you need more air for your mix? If yes, push this knob further! It will boost everything above 10 kHz.
Sometimes I move these presets slightly. But usually, I leave them where they start, activate the plugin, and the result is always magical!
Uses :
➡️ Harmonic enhancement
➡️ Air boost
5. Oxford Inflator (Sonnox)
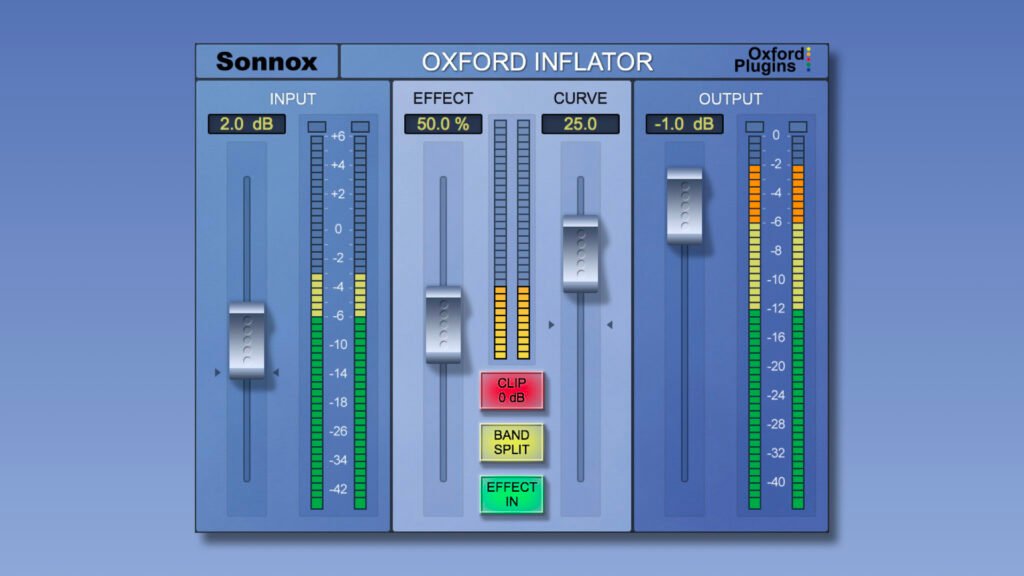
Inflator is the kind of plugin that doesn’t fit in any box but at the same time produces a completely unique effect. This Sonnox plugin has in fact a downward compression algorithm that allows to add an impressive amount of energy to the processed source, in this case very often a mix.
This tool also allows you to enhance the fatness and volume of the source by making it warmer, rounder and more harmonically rich.
The Sonnox plugin also has a handy Band Split function that will split the frequency spectrum into 3 distinct bands: Low, mid and high. As the plugin is a source of quite obvious harmonic enhancement, this 3 band split will be very useful to avoid intermodulation distortion.
Need a professional sound engineer specializing in pop and hip-hop mixing ? Great! Take a look at our services and let’s blow up your career together!
Let’s start now!
Setup and Presets
The special but really great thing about Inflator is that it can be used in a ton of different ways depending on the music genre. You’ll probably never use Inflator the same way in rock as in hip-hop, for example, except in special cases of course.
Being a pop and hip-hop mixing engineer, here is what I use as a preset when I use it: 50% effect and curve 20. In fact, this 50-20 preset adds a touch of energy, power and fatness to the mix that almost always fits! I don’t usually go above these values. If I need to move a parameter, I’ll go for lower values.
But I may go higher than these values in more particular cases like on very heavy rock music, or on hip-hop projects where the bass (often an 808) takes a big place in the mix.
Generally speaking, the goal is to play with the two middle faders and analyze the results to make the best mix decisions.
Uses :
➡️ Energy enhancement
➡️ Fatness booster
➡️ Harmonic enhancement
6. Virtual Mix Rack (Slate)
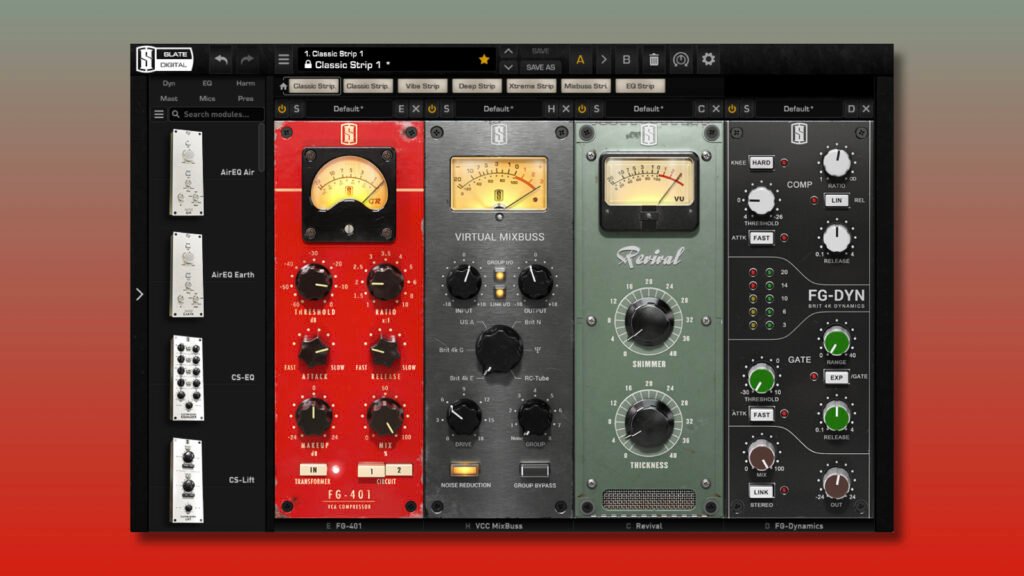
Aaaah! The Virtual Mix Rack, one of the most beautiful inventions of the 21st century in the field of plugins. No, seriously, this rack works super well and is useful at all levels: production, mixing and mastering.
If you don’t know the Virtual Mix Rack yet, it’s a plugin created by Slate Digital that allows you to align several modules in series within the plugin itself. All these modules are, for the most part, emulations of legendary hardware units from brands like SSL, API, Neve, and many others…
Keeping in mind that we have to use it as a mix bus processing and not for anything else, we have to use the appropriate modules. And not all modules are designed for this purpose.
But what are the best modules for mix bus processing? The ones that will completely change the game compared to the competitors? I give you the answer below…
Virtual MixBuss
The Virtual MixBuss module emulates the summing amp characteristics of 6 analog consoles. And if you sometimes feel like your mixes lack warmth and depth, that’s exactly what you need.
When I use this module, I first push the input gain (which will reduce the output gain automatically, super smart) by a few dB. From there, I will switch from one console emulation to another and try to find the one that fits best. The difference between each emulation is huge!
As soon as I have found the color I need, I turn it down a few dB again to find the sweep spot. The analog warmth, presence and sparkle this adds is just awesome!
FG-401
FG-401 is a compressor that blends the features of the best current VCA compressors. I have to admit: It’s a very personal choice. Because not many people consider this module to be one of the best in the Virtual Mix Rack.
But to work well, this plugin is to be used with a lot of subtlety. Just like the G-Master Buss Compressor from Waves, I never exceed 1 dB of gain reduction. This VCA compressor has something more than all its counterparts: the warmth it adds to the mix. It’s very subtle and some people might not even hear it, but this warm analog color is really very unique to the FG-401.
Revival
Revival is a Virtual Mix Rack module that adds air and punch to the processed source. It is also advertised by Slate Digital as a sonic enhancer based on analog circuits.
Revival is the kind of extremely easy-to-use tool that can completely change the color of a mix. Need more air? Boost the shimmer knob! Need some punchy percussion? Then boost the thickness knob! It’s that simple, and it works really well.
These 3 modules are obviously not the only ones in the Virtual Mix Rack that work great on mix busses, feel free to try new combinations and create unique results! Anything is possible with this tool.

7. bx_digital V3 (Brainworx)

The Brainworx brand is known for building high quality plugins that rarely disappoint its users. bx_digital V3 is one of its plugins that have become a must in the world of mixing and mastering.
This plugin might seem very complicated to use with all those buttons and knobs everywhere, but in reality it is very instinctive and can be adapted even for « beginners ».
This EQ is very much used in the music world for its sonic quality but also for a feature that undermines all its competition: its MS features. In this plugin, everything is built to have a total and independent control of the mono and stereo signal, which is essential in mix bus processing.
This highly developed tool also allows you to work on the incoming signal with unlimited precision without drawing attention to the eq graphic (which is, in itself, useless but can help some people to guide themselves).
There is not really a « typical » use of bx_digital V3, it depends on the flaws and qualities of the mix that will be processed by the plugin. But I personally find it very efficient to boost the air zone in a relatively transparent way and to give presence to the mono signal.
Worth a try!
Uses :
➡️ MS processing
➡️ Cleaning EQ
8. Vitamin (Waves)
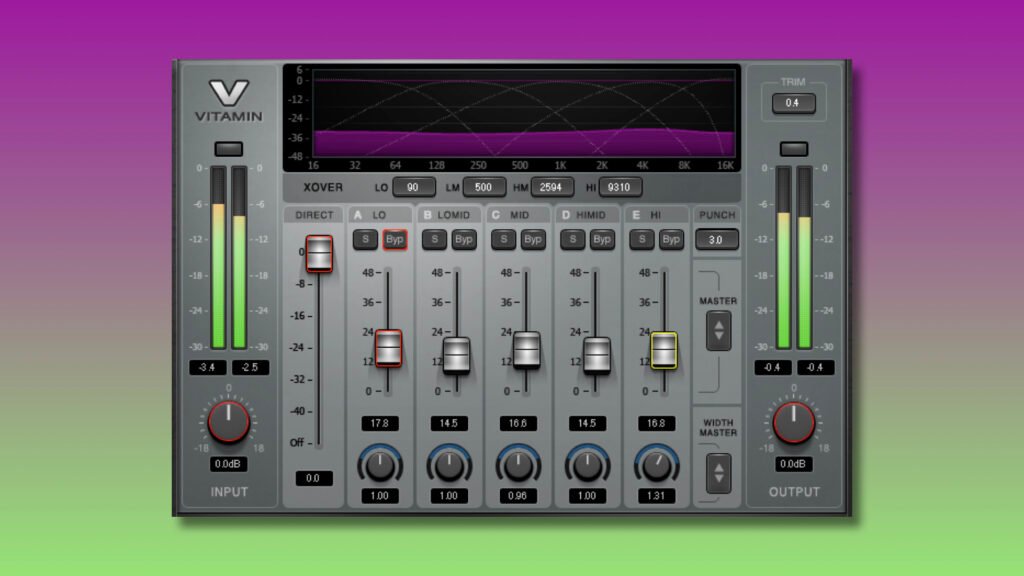
If its interface is anything to go by, Vitamin doesn’t inspire much of anything good and qualitative. However, it is really a plugin that should be on all your mix busses! But what is it exactly?
Vitamin is also a hard to describe plugin, it is an additive EQ, a multiband compressor and a harmonic enhancer all in one. Basically, it is announced by Waves as a multi-band sonic enhancer.
Its principle is simple, each fader corresponds to a frequency range, as soon as you push a fader the associated range is boosted, but through the unique sound result of Vitamin: More robust, richer and more compressed.
In stereo, you’ll also have the ability to expand the stereo of each band separately. A very useful feature when you want to widen the stereo of a source without touching the low-mid range.
ℹ️ Want to learn how to use Vitamin for mixing hip-hop vocals? Then click here: Vitamin | Waves : A Key Plugin To Mixing Hip-Hop Vocals
Setup and presets
What is important to keep in mind when using Vitamin is that the faders should be set high enough for the best results. In fact, the values indicated below each fader are not dB, but just indicators of the amount of each fader.
So you could very well end up with a fader at 25 without it being a crime for your mix. It’s totally normal to have high values.
When you use it as a bus processing mix, I advise you to start by raising each fader a few dB. Personally I always go up to 10, but you might not need to go that high.
Then generally it is always beneficial for your mix to add a little air with the treble fader and, if necessary, a little low with the left fader. I also like to increase the mid-range fader and tighten up the stereo to focus on the vocals (not to mention that I work in genres where vocals are always in the foreground).
Have fun, push those faders as they should be! And you’ll get amazing results from this beast!
Uses :
➡️ Multiband harmonic enhancement
➡️ Tone shaper
➡️ Light compression
Understanding how to use harmonic enhancement in your mixes is super important! Here’s an article that can help you: How To Use Distortion On Rap Vocals
9. Pultec EQP-1A (UAD)
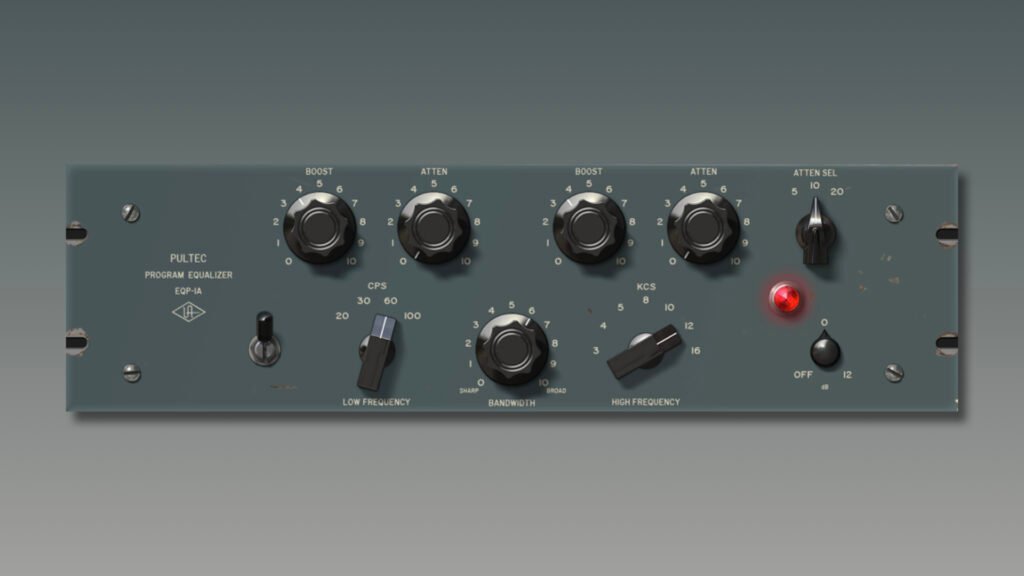
With this legendary EQ emulation, we completely change the register. Where before this list was filled with saturation tools, harmonic enhancement, analog colors, and more, we now have one of the cleanest and most musical EQs in the history of music: The Pultec EQP-1A.
In addition to being natural, accurate and transparent while providing a true Pultec extra energy, this legendary EQ emulation will also be super effective in adding an inimitable vintage feel to your mixes.
But above all, this EQ has the feature that makes this tool unique and uncommon: the ability to boost and cut the same frequency. You will be able to do this kind of thing in the low end of the spectrum, between 20 and 100 Hz. But does it really do anything?
Honestly? Yes, completely! By playing with a boost and a cut on the same frequency, it is possible to make the source much tighter and punchier (for percussion), it creates a very special kind of compression. This kind of sound is impossible to achieve with any other EQ.
ℹ️ The original hardware unit is extremely expensive! But there are clones of the EQP-1A very qualitative, it is the case of the Klark Teknik EQP-KT, I tell you about it right here: Klark Teknik EQP-KT : Review Of A Quality Tube EQ
Setup and presets
As with other plugins on this list, the Pultec EQP-1A does not necessarily have typical settings to apply as mix bus processing. But it does make sense to take advantage of that unique boost in the low end and add some clarity in the high end.
Again, feel free to play with the cut and boost at the same time, it’s just magic.
Uses :
➡️ Robustness (in the bass range)
➡️ Vintage touch
Did you know that some UAD plugins are now native? I’ll tell you about it right here: Spark | UAD : In-Depth Analysis And Review
10. Pro-Q3 (FabFilter)

And last but not least, our beloved FabFilter Pro-Q3! The fact that it is in this list is almost a normality: you can do anything with this plugin in your hands! From ultra precise correction to large dynamically controlled band boosts, this plugin has no limits.
And behind all these seemingly unlimited features and settings, the FabFilter plugin does not disappoint, the audio quality is guaranteed.
But how to use a plugin like Pro-Q3 as a mix bus processing and above all, in an efficient way?
ℹ️ Don’t want to use Pro-Q3 for any reason? Here’s an article that should interests you: Top 9 Alternative Plugins To FabFilter Pro-Q3 (Free & Paid)
Setup and presets
In my opinion, when it comes to mix bus processing, this plugin is ideal when placed first in the processing chain.
By placing it first, you will be able to get rid of all the potential flaws before attacking everything related to the boost. Let’s not forget that mix bus porcessing (or mastering) often means boost. But boosting a mix that is badly balanced in its frequency spectrum would be like killing the mix.
That’s why you can take advantage of Pro-Q3 to get rid of resonant frequencies, too powerful frequency areas or areas that could potentially mask the rest of the spectrum. The dynamic features available in the plugin will often be of great help!
You can also use it to analyze each frequency band in detail (thanks to its spectrum analyzer) to anticipate some potential modifications with other plugins.
In fact, to put it simply, Pro-Q3 should be used to rebalance the mix for the final touches.
Uses :
➡️ Cleaning EQ
➡️ Multiband dynamic control
Need a professional sound engineer specializing in pop and hip-hop mixing ? Great! Take a look at our services and let’s blow up your career together!
Let’s start now!
Bonuses
A top 10 is a top 10, but I thought it was a shame to eliminate some plugins from this list that could potentially help you improve the quality of your bus processing mix.
That’s why I present you very briefly some bonus plugins. The fact that they are not in this top 10 does not detract from their impeccable audio quality!
1. Ozone 10
This super versatile plugin is in the chain of probably 98% of the current mastering engineers. Compressors, multiband harmonic enhancer, dynamic EQ,… It’s all there!
But I didn’t put it in this list for the simple reason that it should be reserved only for mastering. I wouldn’t use it as a mixing engineer.
2. UAD Neve 33609
This plugin is a high quality emulation of one of the most popular VCA compressors ever built. Its only problem to enter this list is that it is a cousin of the SSL 4000 VCA compressor.
So we had to make a choice! And since you probably don’t have thousands of dollars to spend on plugins while reading this article, I chose the most affordable one, the SSL G-Comp Buss Comp (which has nothing to envy to the Neve emulation).
3. McDSP ML4000
This plugin is so good and efficient, but also so ugly and complicated to use! I might have put it in this list if its makers had chosen something else than the color of vomit for their plugins…
No seriously, this plugin is a monster as much on busses mixes as on other sources like vocals for example. But I find it very (too) complicated to use and not very instinctive.
4. UAD Fairchild 670
This plugin provides a warmth, timbre and power that cannot be found anywhere else. The hardware unit is currently selling for tens of thousands of dollars.
But for me, there is a problem: it doesn’t work for all musical genres. In rock, metal or even soul music, this tool is just great, but for anything with more aggressive transients like pop, hip-hop or electro, it usually produces an effect that I think is not suitable for these musical genres.
Conclusion
Waves, UAD, Brainworx, Slate,… all these brands that dominate the plugin market sometimes give the impression that you have to choose THE right plugin to have a high quality bus processing mix. But what is important, in this perspective, is to keep in mind that mix bus processing is above all about making a mix even more exciting, energetic, powerful, alive and deep.
These plugins are tools that will make your job a lot easier and will allow you to get quality results quickly and without having to spend hours in the head. But be careful, good plugin does not always mean good rendering. So don’t hesitate to learn more about each plugin before using them… it’s essential for good results.
If you have any questions about these plugins or about anything in the field of music mixing, please contact me, I’m always very happy to help!
Related Articles:
My favorite tools for mixing pop and hip-hop music:
Plugins
In the field of auto-tune, I’m convinced that nothing’s better and more efficient than Antares Auto-Tune Pro. As for the EQ’s, FabFilter Pro-Q3 and Slate Digital Infinity EQ are, in my opinion, the best tools. For compression, I have 2 favorites plugins: Waves RComp and UAD EL8 Distressor.
As for reverb, I’m a big fan of the Soundtoys Little Plate, but generally, I go for the Valhalla VintageVerb for its versatility. I also love the Arturia Rev PLATE-140 and the UAD Pure Plate for its organic side.
Headphones
The closed headphones I love and will always love using for mixing pop and hip-hop music are the Beyerdynamic DT-770. As for the best open-back headphones, I use the Sennheiser HD600 headphones, and I’m really happy of them!
Monitors
Having a pair of Yamaha HS7 in its studio or home studio is always cool for more excitement while listening to your mixes. The Adam Audio T7V monitors are also super accurate. In my studio, I also have a pair of Genelec 8030 for their reliability.
Hardware gear
For anyone who wants to start using hardware in their mixes, I always recommend these 2 units from Klark Teknik: the EQP-KT and the 76-KT. Don’t forget to use good converters, such as the Apollo interfaces. This is essential for a good rendering.


